I'm not entirely sure what happened, but an entire year has just passed me by! In the meanwhile we finished up summer 2011, we went home to South Africa & Swaziland for a holiday and to see the family, my wonderful husband got a new job, we moved to Boston, my big girl finished second grade, my little boy learned to ride without training wheels, and on and on and on. So much has happened that there's really not much chance of me remembering it all!
So now we're back, and it's June 2012! We now live in a cute little blue house near Boston, MA and things are going well. Moving was hard, but we're in a great place now, and the kids and I are very much enjoying exploring our new home!
Wednesday, June 27, 2012
Wednesday, June 29, 2011
Summer Week 2 - Mad Science!!
Yes, it's Wednesday already and I'm only now getting around to blogging about last week. At least I can't complain (yet) about the summer dragging on! We had another fun and busy week last week, but our plans got changed a little at the end of the week - so we did a little less activities and a little more playdates with friends :)
So last week our "theme" was MAD SCIENCE. Some of our stuff worked - other stuff, not so much, lol.
* Monday - We started some rock candy, using these instructions. The plan was to eat it on Friday, but for some reason we got NO crystals at all. I think that the seed crystals we created by rolling the skewers in sugar just disolved and left nothing to start the crystals growing. The kids were disappointed, but it was a lesson in how not all science experiments work.
We also did some colour mixing in test tubes - and I was amazed at how long both kids were kept entertained! We happened to have some plastic test tubes and pipettes, which I filled with water and added a few drops of food colouring to. The kids sucked up colours with the pipettes and transferred to other test tubes. We ended up with a lot of messy spillage, and a lot of brown-ish black liquid but they both spent a long time seeing what happened to the colours, and honing their fine motor skills. Success!


* Tuesday - The kids had their first swimming lesson! As predicted my big girl (who was a mermaid in another life I think) loved it and was in her element. My baby boy on the other hand screamed, kicked and fussed for most of the lesson. He screamed "I want my Mummy" at the top of his lungs every time the instructor came near him. Not much fun.
We also headed to the library for their free arts and crafts activity - where we created an artists book of places we'd like to visit. Fun! Can't say how much I love that our local library has so much happening this summer - they've been a lifesaver already!!!!
* Wednesday - Today we headed out to meet friends at the $1 movie ! So nice to be able to take all the kids to the movies for so cheap, and always fun to meet up with friends. We also did a little shopping there (for the Mums, not the kids!) and had pizza for lunch.
When we got home we did a quick experiment with ivory soap and the microwave - very cool! My main tip for this one is to cut the ivory soap into quarters - for 2 reasons, 1) it will expand and with a whole bar you may end up with soap all over your microwave! and 2) they WILL ask to do it again :)


* Thursday - In the morning we headed back out to our beloved library - their show this week was none other than Mad Science! We also collected the kids first prizes for reading 10 books - we got tickets to the baseball!!! And also bubbles, erasers, a recorder and an inflatable globe. The show was fun too.
Then we had another swimming lesson, which went off much better - thankfully!
In the afternoon we tried to do a couple more experiments at home - we did the mentos and coke experiment outside. I think I was considered the coolest Mum ever after than one!! But not quite as cool as these guys!
We also did magic balloons - I found the protocol in an activity book of my daughter's. I put some baking soda in a couple of new uninflated balloons, put some vinegar in some empty water bottles and then put the balloons on the tops of the bottles. When the balloons are on the bottles you empty the baking soda into the vinegar and it fizzes, releasing carbon dioxide, which in turn blows up the balloons. It worked really well, but I used entirely too much baking soda and vinegar so the balloons got liquid in them too. The protocol calls for 4 TBS vinegar in the bottle, and 2TBS baking soda in the balloon - I'm sure that would be plenty!

Week 3 is half over already - and the theme is Fairytales!
Monday, June 20, 2011
Summer - Week 1 - The 5 Senses
I kept meaning to update over the weekend, but somehow life (and the pool, and Father's Day etc) got in the way and I didn't have a moment to sit down and blog. And now week 2 has begun already and I still need to blog about week 1 (I suspect this may become a common thing....).
My plan for the summer is this - have a "theme" for each week, and plan an outing and one or two activities each day. I do want the kids to have time for relaxation and free play, but I also need something to pull out of my pocket when they start to go at each other's throats (or otherwise drive me crazy). My "themes" are just a loose general idea - more to give me some direction when choosing activities than anything else. There are SOOOO many great ideas out there, so I like having a way to narrow them down and pick a couple to do with the kids.
Last week our "theme" was The 5 Senses. So we did things like:
Tuesday- go to a frozen yogurt shop (self-serve, pick your own flavour and toppings, everything done by weight - it was scrumptious!) for "taste".
Koolaid scratch n sniff paintings for "smell" - I got the idea from Serving Pink Lemonade It was a lot of fun, but we were all a little disappointed that the smell had pretty much disapated by the evening (when Daddy got home & the kids wanted to show off their artwork).
And we spent some time at the pool, since it was the first full day of our summer vacation :)


Wednesday - scented playdough (I've seen this idea around a lot, but I used a recipe I tore out from a magazine ages ago, and just added a few drops of food colouring and flavouring). I was AMAZED at how long the kids played with this - even my very "grown-up" 6 1/2yr old daughter!!
We also went out to the Farmers Market, where we rode Llamas, bounced on the bouncy castle and tasted some samples. We also bought some very yummy chocolate covered strawberries.


Thursday - We headed up to the library, where we signed up for the summer reading programme. They also had a musician performing - he was showed the kids all different kids of instruments, from the usual guitar, to ukelele's & banjos, recorders and various other flutes. It was a ton of fun!! We also stopped and picked out a couple of new books to read.
We made Father's Day cards using shaving foam marbling - I used these instructions and was AMAZED that it actually worked. This was also fun because it turned into the kids playing with shaving foam for ages (I put some freezer paper down on the table and they just smeared it all over them and the table).


Friday - by now I was getting tired, lol. We spent the morning at the park, and then got my little guy a much-needed haircut. And we still managed to make some swirl cookies (which turned out VERY colourful, but not particularly yummy - I think that may be something to do with the fact that I am not very good in the kitchen, AT ALL!) .
I also tried out some sandpaper colouring - we put some paper over the sandpaper and coloured, noting the texture. We also tried colouring with crayons on the sandpaper and melting it in the oven (I got the idea here ) but nothing remarkable happened.
And we're on to week 2 - and our "theme" for this week is MAD SCIENCE!
My plan for the summer is this - have a "theme" for each week, and plan an outing and one or two activities each day. I do want the kids to have time for relaxation and free play, but I also need something to pull out of my pocket when they start to go at each other's throats (or otherwise drive me crazy). My "themes" are just a loose general idea - more to give me some direction when choosing activities than anything else. There are SOOOO many great ideas out there, so I like having a way to narrow them down and pick a couple to do with the kids.
Last week our "theme" was The 5 Senses. So we did things like:
 |
| Funfetti & Angel Foodcake yogurt with chocolate chips |
 |
| Chocolate yogurt with mini M&Ms |
 |
| Scratch n sniff Koolaid painting |
And we spent some time at the pool, since it was the first full day of our summer vacation :)


Wednesday - scented playdough (I've seen this idea around a lot, but I used a recipe I tore out from a magazine ages ago, and just added a few drops of food colouring and flavouring). I was AMAZED at how long the kids played with this - even my very "grown-up" 6 1/2yr old daughter!!
 |
| Fun with scented playdough - we had vanilla, peppermint & banana scents |


Thursday - We headed up to the library, where we signed up for the summer reading programme. They also had a musician performing - he was showed the kids all different kids of instruments, from the usual guitar, to ukelele's & banjos, recorders and various other flutes. It was a ton of fun!! We also stopped and picked out a couple of new books to read.
We made Father's Day cards using shaving foam marbling - I used these instructions and was AMAZED that it actually worked. This was also fun because it turned into the kids playing with shaving foam for ages (I put some freezer paper down on the table and they just smeared it all over them and the table).


Friday - by now I was getting tired, lol. We spent the morning at the park, and then got my little guy a much-needed haircut. And we still managed to make some swirl cookies (which turned out VERY colourful, but not particularly yummy - I think that may be something to do with the fact that I am not very good in the kitchen, AT ALL!) .
I also tried out some sandpaper colouring - we put some paper over the sandpaper and coloured, noting the texture. We also tried colouring with crayons on the sandpaper and melting it in the oven (I got the idea here ) but nothing remarkable happened.
And we're on to week 2 - and our "theme" for this week is MAD SCIENCE!
Thursday, June 9, 2011
It's ALMOST summer!!!!
Well my little guy has been off school for a little over a week now, but my big girl still has 2 more days of 1st grade left, so it's not quite officially summer holidays here yet. She's almost done with first grade and I simply cannot believe it - the year has flown by. She's growing up WAY too fast for my liking!! I've been neglecting the blog a little because of having my little boy home, and having the neighbour's little girl here too, but I really do intend to get back and blogging because I have so much fun stuff planned for the summer. I'm actually looking forward to summer this year - I have a plan to keep us learning, playing, being active and having fun (and hopefully not at each other's throats all.the.time!). Lets see how long my plan works for (I am notorious for starting with guns blazing and having things fizzle out before too long....)....
Anyway, this week my boy-tjie has been on his new "big boy" bike a lot:


Anyway, this week my boy-tjie has been on his new "big boy" bike a lot:

And we made some banana bread (the best part ofcourse is licking the bowl!)

And my big girl (did I mention how she's growing up too fast - LOOK at this photo?!!) has had a dress rehearsal for her Jazz dance recital. The recital is tomorrow night - she's so excited!

Next week she has a short day on Monday and then we are officially on
summer holidays - YAY!!
Wednesday, May 25, 2011
Super Quick Fairy Wands
We recently had a playdate problem - we had 3 kids, and only 2 fairy wands!! Oh, the drama! After a moment of diffusing the "I got it first", "She won't share" issues, I quickly resolved the problem with this little craft.
Super Quick Fairy Wands
What you need:
* Paper
* Glue
* Sticky Tape
* Contact paper
* Scissors
* Crayons/stickers/markers (something to colour & decorate with)
* skewers
Here's what we did:
1) I printed some star shapes off the internet (2 for each wand, a back and a front)
2) The kids coloured & decorated their stars
3) Once they were done I cut out the star shapes (my big girl was able to do her own)
4) I taped the skewer to the back of one of the stars
5) I glued the back and front stars together (sandwiching the skewer between them)
6) I covered the stars in contact paper (both sides) and cut them out
7) Perfect fairy wands for each person at the playdate!!
Ofcourse you could always embelish these and make them much fancier with glitter, ribbons etc
Super Quick Fairy Wands
What you need:
* Paper
* Glue
* Sticky Tape
* Contact paper
* Scissors
* Crayons/stickers/markers (something to colour & decorate with)
* skewers
Here's what we did:
 |
| My beautiful fairy girl carefully colouring the star for her wand |
2) The kids coloured & decorated their stars
3) Once they were done I cut out the star shapes (my big girl was able to do her own)
4) I taped the skewer to the back of one of the stars
5) I glued the back and front stars together (sandwiching the skewer between them)
6) I covered the stars in contact paper (both sides) and cut them out
7) Perfect fairy wands for each person at the playdate!!
 |
| 2 wands in the making - so you can see the back and the front |
 |
| This little man wouldn't stand still long enough to let me photograph his wand, but you get the idea. |
Ofcourse you could always embelish these and make them much fancier with glitter, ribbons etc
Sunday, May 15, 2011
Letter E elephant
Just a quick post, to let you all know I have not, infact, fallen off the edge of the world :P All is good here, just busy - as life tends to be with 2 kids! They both seem to be full of the summer sillies at the moment too, ready for the L O N G summer holidays to begin. Not sure Mum is quite so ready!
 Anyway - here's the Letter E, elephant that the little guy and I managed to fit in one day recently.
Here's what we did:
1) I printed out the outline of a letter E (lowercase)
2) The little guy painted it. We talked about how elephants are grey etc, but he still wanted to use all the colours in his watercolour palette - so that's what he did.
3) While the paint dried I cut an elephant ear and trunk out of black construction paper.
4) When the paint was (mostly) dry - I cut out the letter E
5) The little guy glued the letter e onto some construction paper, and then glued on the ear, trunk and googly eye.

I think we ended up with a cute little multicoloured elephant!
Tuesday, April 19, 2011
Beautiful Butterflies
We're still very much working off a "spring" theme for inspiration for crafts etc in this household :) Here's our latest creation:
Beautiful Butterflies
You will need
* Clear contact paper
* Some coloured celophane (I used celophane gift bags that I picked up on clearance at Michaels!)
* Coloured paper
* Scissors
* Pipe cleaner
What we did:
1) I cut the contact paper into the shape of a butterfly (for the little guy - my daughter managed herself)
2) Cut the paper into a butterfly body shape
3) Have the kids cut the celophane into little pieces
4) Have the kids stick the body onto the clear contact paper
5) Let them decorate the wings with the coloured celophane (it's so nice that the contact is sticky and no glue is needed!)
6) When they're satisfied with their wing design take the butterfly and put it decorated side down onto the sticky side of another piece of contact paper. This sandwiches the celophane and the body between 2 pieces of contact paper.
7) Cut out the butterfly
8) Push a pipe cleaner through the body of the butterfly to create antennae
9) Hang on your window and enjoy your beautiful butterfly!

Beautiful Butterflies
You will need
* Clear contact paper
* Some coloured celophane (I used celophane gift bags that I picked up on clearance at Michaels!)
* Coloured paper
* Scissors
* Pipe cleaner
What we did:
1) I cut the contact paper into the shape of a butterfly (for the little guy - my daughter managed herself)
 |
| Butterfly shape out of contact paper |
3) Have the kids cut the celophane into little pieces
4) Have the kids stick the body onto the clear contact paper
5) Let them decorate the wings with the coloured celophane (it's so nice that the contact is sticky and no glue is needed!)
 |
| Concentrating on wing design! |
6) When they're satisfied with their wing design take the butterfly and put it decorated side down onto the sticky side of another piece of contact paper. This sandwiches the celophane and the body between 2 pieces of contact paper.
7) Cut out the butterfly
8) Push a pipe cleaner through the body of the butterfly to create antennae
9) Hang on your window and enjoy your beautiful butterfly!
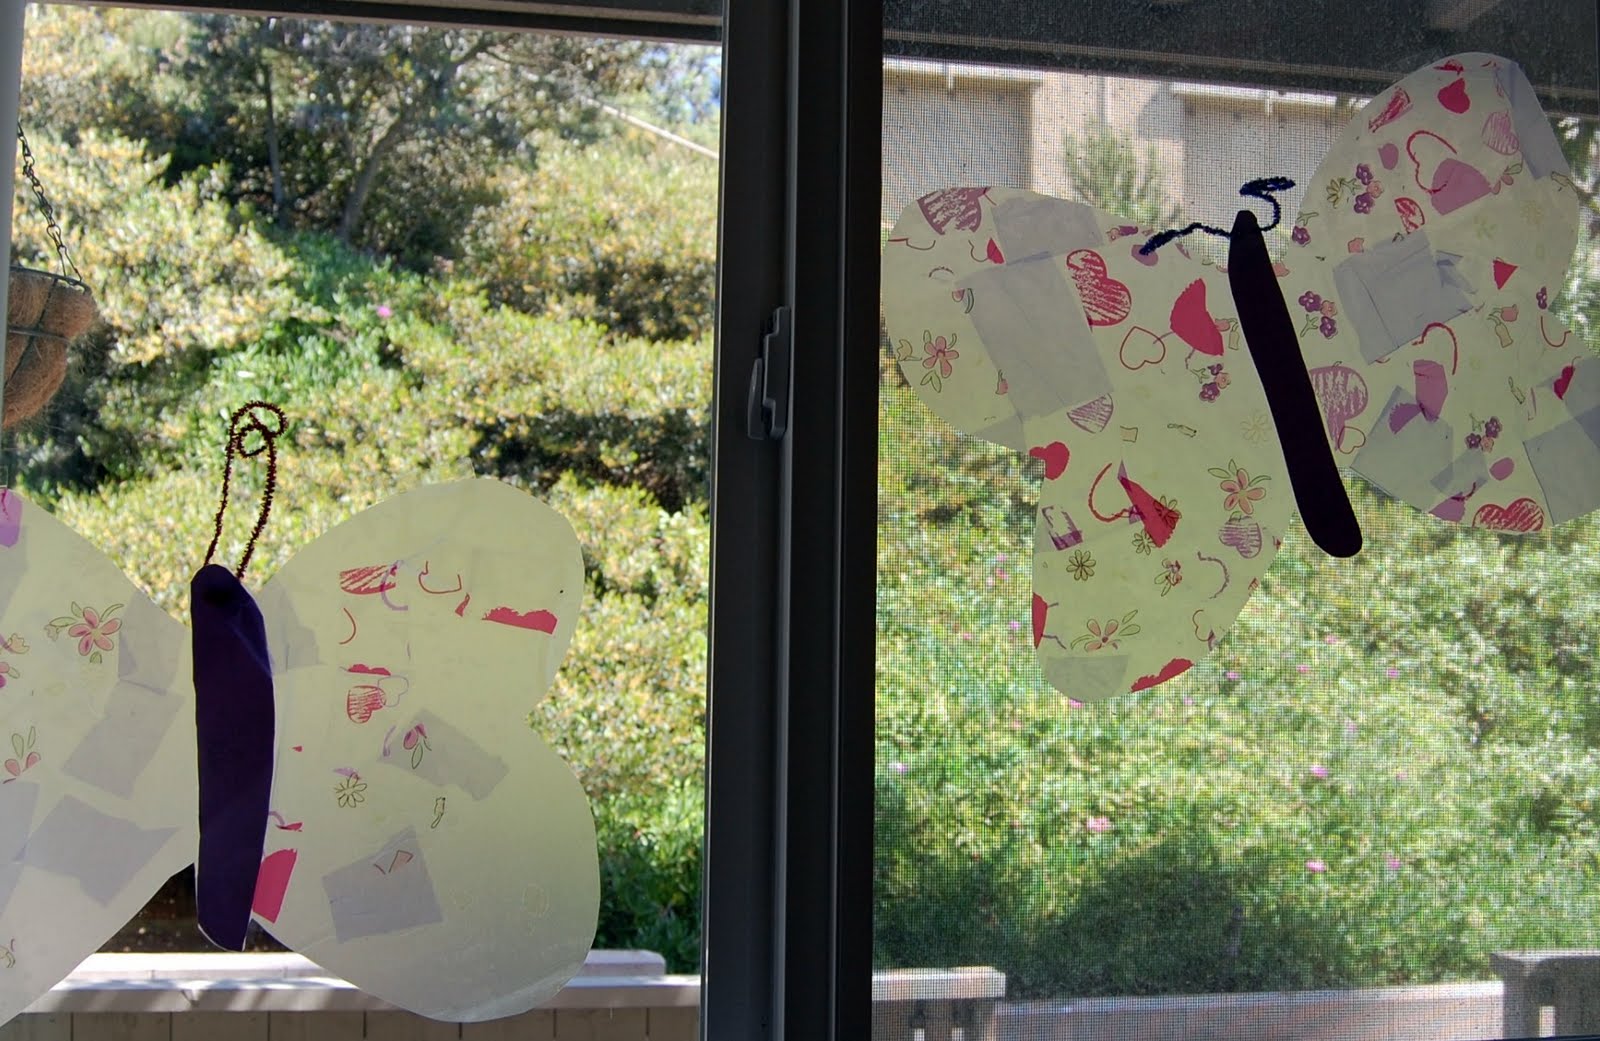 |
| Beautiful Butterflies |

Subscribe to:
Posts (Atom)